Friday, June 24, 2016

Resizing a Ladies' 1860s Bodice to Fit a Child (Part 2)

I had not actually planned to write and post this tonight. My poor phone is not working due to too many pictures, so I had to get these pics off. My thoughts needed composing before life got in the way and I forgot what I did, so here it is! Lol


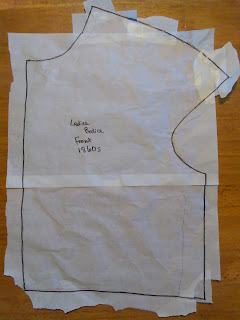
In the last post I didn't have pattern pieces to resize, so I had used an existing garment to trace off a pattern. Then I had traced off a copy to use in this post to slash. 

Slashing Bodice Pattern Pieces

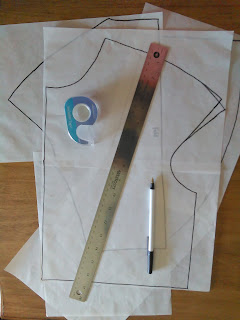
Supplies used:

Traced copied pattern pieces
Long ruler or other straight edge
Ink pen or Pencil
Clear, easily removable tape


*Note, I am using the method of Resizing Patterns from Sensibility.com.

Next, I measured off an existing non-stretchy garment from my daughter (a Sunday dress) that fit her well in the: waist, shoulder-to-waist, and armscye. Write down these exact measurements, rounding to about 1/4".

Slashing Vertically:

I laid a half bodice front pattern piece out on an inch-marked cardboard cutting board and marked a vertical line down from the centers of the neckline, shoulder, and armscye. Next, I cut apart my pattern into four pieces. Move the pieces, equally overlapping them (divide the total measurements for the chest and waist by 8), until the desired size is reached. Tape these pieces together in many places.


Slashing Horizontally:

To mark the horizontal slash points, locate the centers of the armscye and around the waistline. Slash along these lines. Again, shorten until the armscye and shoulder-to-waist are right according the the measurements. Tape in place.


You will, no doubt, have an overwhelming mess of lines at this point. I don't have a French curve(such as this one) to finish this off, but if/when I do, I will finish this project for another post. :( Meanwhile, I refer you to my original Resizing Patterns resource from Sense & Sensibility Patterns to complete your project!


For now, I believe I have discovered a simpler way to make a decent replica of an infant/toddler/child mid-19th century bodice and sleeves(of which I am Super Excited about!), so stay tuned as I will be sharing that soon! :D


Good night, y'all!

Love,
Mindy
Wednesday, June 22, 2016

Resizing a Ladies' 1860s Bodice to Fit a Child (Part 1)

Today I have embarked on something I never though myself capable of: 

Resizing an adult-sized pattern to fit a small child.


I am generally, or used to be, the kind of person who has to have things "*just* like the picture" or it just isn't right or good enough, or is wrong.

Well, God is showing me how I need to change and one of the things I'm working through is Fear. Fear can be paralyzing. Fear can make us believe we (or our work) aren't good enough. The Bible states in 1 John 4:18, "There is no fear in love. But perfect love drives out fear, because fear has to do with punishment. The one who fears is not made perfect in love." (NIV) Fear and punishment. How many times have I feared failure in a project not coming together EXACTLY as someone else's, or as I had pictured it? Then I beat myself up, punishing myself that it isn't perfect. Christ came to give us freedom from fear; freedom to love; freedom to love life and enjoy it. So, I am stepping out in faith, throwing perfectionism to the wind, for closer-to originality!


Anyway, off the soap-box and off to this pattern resizing biz... ;)

After almost finishing a Mid-19th Century Toddler Short Sleeved Gown for Jane using Sarah Jane's free pattern from Romantic History, I decided, living in the cold North, that a long-sleeved dress would be more practical. Since I don't like to spend money unless I absolutely have to (or just want to!), and no free patterns were available at this time, it was time to make my own, or at least learn in the trying!

After finding Sense & Sensibility.com had a tips page on Resizing Patterns, and I remembering that I already had a basic ladies 1860s bodice pattern, I couldn't say no.

I had used the Ladies Early 1860s Dress Pattern from Laughing Moon Mercantile before to create this dress several years ago for living history events:


 Glendower Manson, Eaton, OH, 2011


After our move last year, we are still finding things, or I'm finding that things are still at my parents house. X) I have the envelope for this pattern, but not a clue as to where the actual pattern pieces are.

So to begin to resize a pattern, it helps to have pattern pieces. Or, if you are like me and don't have any available, or are wanting to work off an existing piece, here is what I did...


Tracing Existing Bodice and Sleeves

First, here are the supplies I used:

Tracing paper
Tape (not necessary if paper is large enough)
Ink pen or Pencil
Permanent marker
Pins
Scissors


I taped enough pieces of paper together to cover the desired pattern piece I was going to copy (bodice front, bodice back, sleeve, etc.). I started with the bodice front, working from the inside(lining side), laying the bodice front out on a flat surface, smoothing out any wrinkles, and pinning the tracing paper to the center front as an anchor point. I began to trace, starting with the center front, moving across the neck and shoulder, then waistline and side seam, then into the armscye. This last part, working out the arm hole, was the hardest part as they were set further back and off the natural shoulder on bodices during the mid-18th century.


Tracing paper pinned to center bodice front and working into armscye
Tracing off bodice front armscye, the hardest part
Rough shoulder and armscye bodice draft
Bodice garment back folded in half

After doing the bodice front, I then folded the bodice back in half and traced it off. The last piece to trace was the sleeve. The sleeves on this dress were of the coat style, and were pretty much the same, front and back, so I only needed to trace off one.


Tracing paper pinned to bodice back

Ta-da! Work out any last details (straightening lines, etc), and trace over your final outline with a permanent marker. *Note: You will be keeping this pattern tracing as a reference, so you will want to keep this in tack, as is, and make another tracing (hand copy) of it to do the size adjustments.


Bodice front 1st draft


Bodice back 1st draft


Sleeve 1st draft

 As it is almost tomorrow here, I shall sign off for today! Happy crafting!

Love,
Mindy

Monday, June 20, 2016

A Much Overdue Post...

Since it has been many a year since I have blogged, and I have been itching to get going again, well here is my feeble attempt at a life update. :)

2011:
My summer was spent attending Civil War events with the Living History group, Ohio Valley Civil War Association, in IN, OH, and IL. I also met my future husband and we began talking. In October, my parents drove me to Gettysburg, PA where I was privileged to spend a few days with my Living History group for a private event.


2012:
Michael and I began courting, got engaged, and later that summer, were married. <3 I moved from Indiana to Illinois to live with him where he was pastoring a small church and we settled into married life. For an early Christmas present, Michael got me a companion for when he was gone on trips, a black little Cockapoo puppy, which I named Maggie. And so our little family gained it's first four-legged member. :) Days after our first Christmas, I started a home business of handmade items, "Fresh from the Flowers", and later listed things on Etsy.


2013-2014:
We served in our church, worked outside the home, experimented with a small cinder-block raised garden, attended Michael's softball games, spent time with friends, lived life. Michael was ordained in the summer of 2014 at which time we told our parents they were soon-to-be grandparents. :) We also welcomed a young blue merle Australian shepherd, Shelby, to our family.

2015:
In the spring our first child was born to us, a tiny sweet girl, Jane. Consequently, my first Mother's Day and birthday fell on the same day. What a joyous Sunday! Come summer we received a call to pastor a church in the state Michael spend several years of his childhood, Alaska. We accepted the call after a visit, and, after many weekend yard sales and re-homing Shelby, we moved up to The Last Frontier in August. God has been doing many a miracle in our small church and has brought many a new face through our doors. Praise be to God and the power of prayer! We are thankful for our new church family who has truly taken us under their wings and made us a part of their lives, as we now live several thousand miles away from any close relatives. We are excited to see how the Holy Spirit will continue to move in our hearts and lives in the days to come!