Today I have embarked on something I never though myself capable of:
Resizing an adult-sized pattern to fit a small child.
Well, God is showing me how I need to change and one of the things I'm working through is Fear. Fear can be paralyzing. Fear can make us believe we (or our work) aren't good enough. The Bible states in 1 John 4:18, "There is no fear in love. But perfect love drives out fear, because fear has to do with punishment. The one who fears is not made perfect in love." (NIV) Fear and punishment. How many times have I feared failure in a project not coming together EXACTLY as someone else's, or as I had pictured it? Then I beat myself up, punishing myself that it isn't perfect. Christ came to give us freedom from fear; freedom to love; freedom to love life and enjoy it. So, I am stepping out in faith, throwing perfectionism to the wind, for closer-to originality!
Anyway, off the soap-box and off to this pattern resizing biz... ;)
After almost finishing a Mid-19th Century Toddler Short Sleeved Gown for Jane using Sarah Jane's free pattern from Romantic History, I decided, living in the cold North, that a long-sleeved dress would be more practical. Since I don't like to spend money unless I absolutely have to (or just want to!), and no free patterns were available at this time, it was time to make my own, or at least learn in the trying!
After finding Sense & Sensibility.com had a tips page on Resizing Patterns, and I remembering that I already had a basic ladies 1860s bodice pattern, I couldn't say no.
I had used the Ladies Early 1860s Dress Pattern from Laughing Moon Mercantile before to create this dress several years ago for living history events:
 |
| Glendower Manson, Eaton, OH, 2011 |
After our move last year, we are still finding things, or I'm finding that things are still at my parents house. X) I have the envelope for this pattern, but not a clue as to where the actual pattern pieces are.
So to begin to resize a pattern, it helps to have pattern pieces. Or, if you are like me and don't have any available, or are wanting to work off an existing piece, here is what I did...
Tracing Existing Bodice and Sleeves
First, here are the supplies I used:
Tracing paper
Tape (not necessary if paper is large enough)
Ink pen or Pencil
Permanent marker
Pins
Scissors
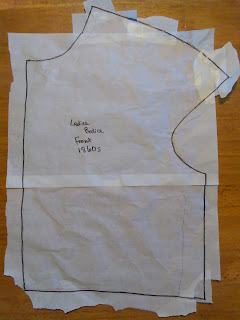
I taped enough pieces of paper together to cover the desired pattern piece I was going to copy (bodice front, bodice back, sleeve, etc.). I started with the bodice front, working from the inside(lining side), laying the bodice front out on a flat surface, smoothing out any wrinkles, and pinning the tracing paper to the center front as an anchor point. I began to trace, starting with the center front, moving across the neck and shoulder, then waistline and side seam, then into the armscye. This last part, working out the arm hole, was the hardest part as they were set further back and off the natural shoulder on bodices during the mid-18th century.
 |
| Tracing paper pinned to center bodice front and working into armscye |
 |
| Tracing off bodice front armscye, the hardest part |
 |
| Rough shoulder and armscye bodice draft |
 |
| Bodice garment back folded in half |
After doing the bodice front, I then folded the bodice back in half and traced it off. The last piece to trace was the sleeve. The sleeves on this dress were of the coat style, and were pretty much the same, front and back, so I only needed to trace off one.
 |
| Tracing paper pinned to bodice back |
Ta-da! Work out any last details (straightening lines, etc), and trace over your final outline with a permanent marker. *Note: You will be keeping this pattern tracing as a reference, so you will want to keep this in tack, as is, and make another tracing (hand copy) of it to do the size adjustments.
 |
| Bodice front 1st draft |
 |
| Bodice back 1st draft |
 |
| Sleeve 1st draft |
As it is almost tomorrow here, I shall sign off for today! Happy crafting!
Love,
Mindy


No comments:
Post a Comment